출처 : https://stackoverflow.com/questions/42605769/openai-gym-atari-on-windows
이젠 이렇게 설치하시면 됩니다.
A while ago I have created a fork with Windows support (devs of original repository do not merge or even comment PRs and issues). It does not require neither MSYS/Cygwin nor CMake or Zlib.
To simply install atari-py wheels (binaries) use this command:
pip install --no-index -f https://github.com/Kojoley/atari-py/releases atari_py
If you have any distutils supported compiler you can install from sources:
pip install git+https://github.com/Kojoley/atari-py.git
Test your installation with a simple example:
import gym
env = gym.make('SpaceInvaders-v0')
env.reset()
for _ in range(1000):
    env.step(env.action_space.sample())
    env.render('human')
env.close()  # https://github.com/openai/gym/issues/893
If your got a 'scrambled' output that's most likely because your gym is outdated.
answered Oct 13 '17 at 23:33
----------------------------------------------------------------------------------------------------------------------------------------------------
윈도우에서는 기본적으로 gym[atari]가 build 가 안 되기 때문에 인터넷을 뒤지다 찾은 내용을 공유합니다.
https://github.com/rybskej/atari-py
여기 보고 따라하셔도 될 것 같습니다.
아나콘다(python) 등은 이미 설치되어 있어 pip 를 사용할 수 있는 상태라고 생각하겠습니다.
설치방법
1. http://www.msys2.org/ 여기에 들어가서 아래 파일을 받고


2. 설치한 후에 msys 터미널에서
pacman -S base-devel mingw-w64-x86_64-gcc mingw-w64-x86_64-cmake 라고 칩니다.

3. 아래 상황에서 그냥 엔터 누르시면 됩니다.

4. 설치 진행하겠냐고 물으시면 y 누르시면 되고요.

5. 설치가 완료되었으면 창을 끄고, 내컴퓨터에서 속성을 누릅니다.

6. 여기서 고급 시스템 설정으로 들어갑니다

7. 환경변수로 들어갑니다.

8. 시스템 변수에서 새로만들기를 눌러서 이름은 DISPLAY 값은 :0을 넣습니다.
다시 하나더 만들어줍니다.
이름은 PYTHONPATH 값은 C:\path\to\atari-py:$PYTHONPATH을 넣습니다.


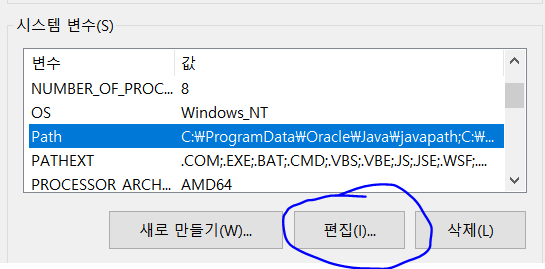
9. path 라는 변수에 편집을 누릅니다.
10. 새로만들기에서 두개의 변수를 추가해줍니다.
C:\msys64\mingw64\bin
C:\msys64\usr\bin
추가하고 다 닫고 나옵니다.


11. https://sourceforge.net/projects/xming/?source=directory 여기에 가서 다운로드하고 설치해줍니다.

12. git for windows 를 설치해줍니다.
https://git-scm.com/download/win 여기에서 받으실 수 있습니다.

13. git for windows 설치시에 계속 next 누르셔도 상관없지만 아래부분에 주의해주세요. (사실 default라 계속 다음 누르셔도 상관없습니다)
이렇게 해야 cmd(명령어 프롬프트)에서도 사용하실 수 있습니다.

14. 명령어 프롬프트에 들어가셔서 다음과 같은 명령어로 복사해옵니다.
git clone https://github.com/rybskej/atari-py


15. 다운이 끝나면 cd atari-py 를 통해 atari-py 폴더로 이동합니다.

16. 이동후에 make 라고 쳐서 build 해줍니다.

17. 빌드가 끝났으면 python setup.py install 이라고 쳐줍니다.

18. 다 끝나면 pip install "gym[atari]" 라고 쳐서 설치해줍니다.

19. 테스트해보겠습니다.
import gym
env = gym.make("SpaceInvaders-v0")
env.reset()
for _ in range(1000):
    env.render()
    env.step(env.action_space.sample())

20. 잘 되는 걸 알 수 있습니다. 강화학습 열심히 하세요

2017년 2월 13일 첨부파일 추가 libale_c.dll
 libale_c.dll